OpenTelemetry ClickHouse Java Client Instrumentation
Table of Contents
Over the summer, I took on the task of adding support for instrumenting the ClickHouse Java client in the OpenTelemetry Java agent, which was later included in the 2.6.0 release. As this was my first experience writing an instrumentation module, I wanted to take some time to reflect on my approach and review the steps involved. The instrumentation itself is relatively straightforward, making it an ideal example for newcomers to the codebase who are learning the fundamentals.
Considerations before getting started
Instrumentation type
There are two types of instrumentation that can be written, library and javaagent. Here are the explanations of
each as written in the documentation:
Library instrumentation: This is logic that creates spans and enriches them with data using library-specific monitoring APIs. For example, when instrumenting an RPC library, the instrumentation will use some library-specific functionality to listen to events such as the start and end of a request and will execute code to start and end spans in these listeners. Many of these libraries will provide interception type APIs such as the gRPC ClientInterceptor or servlet’s Filter. Others will provide a Java interface whose methods correspond to a request, and instrumentation can define an implementation which delegates to the standard, wrapping methods with the logic to manage spans. Users will add code to their apps that initialize the classes provided by library instrumentation, and the library instrumentation can be found inside the user’s app itself.
Javaagent instrumentation: This is logic that is similar to library instrumentation, but instead of a user initializing classes themselves, a Java agent automatically initializes them during class loading by manipulating byte code. This allows a user to develop their apps without thinking about instrumentation and get it “for free”. Often, the agent instrumentation will generate bytecode that is more or less identical to what a user would have written themselves in their app.
I decided to go with the javaagent instrumentation type, so that users can leverage the functionality
without any additional code changes needed within their apps.
Semantic Conventions
Since this is a database client, there are Semantic Conventions for Database Client Calls that should be followed when creating things like span attributes. The conventions provide a standard way to represent database operations and are used to ensure that the data is consistent and can be easily consumed by other tools.
We will focus on implementing the stable attributes, which at the time were:
- db.system
- db.name
- db.operation.name
- db.query.text
- server.address
- server.port
Multiple client versions
When I began writing the new instrumentation, the “v2” version (client-v2) of the ClickHouse client was still in its early stages, with many features incomplete and frequent changes underway. Given the instability, I decided to focus on instrumenting the existing v1 first. My plan was to monitor the development of v2 and follow up with instrumentation once it had stabilized.
Oldest supported version
The next consideration was to identify the oldest version of the client to support, as mentioned in the documentation:
When writing new instrumentation, create a directory inside
instrumentationthat corresponds to the instrumented library and the oldest version being targeted. Ideally an old version of the library is targeted in a way that the instrumentation applies to a large range of versions, but this may be restricted by the interception APIs provided by the library.
The latest version when I started experimenting was 0.6.1. I went through all the previous release changelogs and
code to see what had changed over time, and decided that 0.5.0
seemed like a good starting point. It was in that version when they made the underlying http client the default,
and it had been out for a decent amount of time (since Oct 2023).
With that decision made, I created the new instrumentation gradle file and configured it to target versions 0.5.0+
// instrumentation/clickhouse-client-0.5/javaagent/build.gradle.kts

muzzle {
  pass {
    group.set("com.clickhouse.client")
    module.set("clickhouse-client")
    versions.set("[0.5.0,)")
    assertInverse.set(true)
  }
}

dependencies {
  compileOnly("com.clickhouse:clickhouse-client:0.5.0")
  ...
}
What to Instrument?
Now we know which version of the client to target, so it’s time to figure out what to actually instrument. I started by looking at the clickhouse-client code and setting up a test code lab where I could familiarize myself with the various ways of using client. I had some initial struggles due to some incorrect code examples in the documentation and ended up contributing a few small changes to help clarify them.
The documentation provided an example of a query as follows:
try (ClickHouseClient client = ClickHouseClient.newInstance(ClickHouseProtocol.HTTP);
     ClickHouseResponse response = client.read(servers)
        .format(ClickHouseFormat.RowBinaryWithNamesAndTypes)
        .query("select * from numbers limit :limit")
        .params(1000)
        .executeAndWait()) {
            ClickHouseResponseSummary summary = response.getSummary();
            long totalRows = summary.getTotalRowsToRead();
}
My first thought was to instrument the query method itself, but after some experimentation and further digging into
the code, I noticed that there are several ways to execute a query. Luckily, all of them ultimately end up
calling the execute or executeAndWait methods, so I decided to focus on instrumenting those instead.
Start with tests
Before working through getting all the various pieces wired up, I want to have a way to verify success when things are
working. I started by porting over some of the code I had written in the test code lab to a new test module with
a test container running a clickhouse database. Then, all we need are some basic tests to verify that the spans were
being created as expected in both the execute and executeAndWait methods.
We know the attributes we should expect (the semantic conventions), so we can start by writing assertions that those are included in the spans. We can use a helper method to encapsulate them because we’ll be reusing them often:
  private static List<AttributeAssertion> attributeAssertions(String statement, String operation) {
    return asList(
        equalTo(DbIncubatingAttributes.DB_SYSTEM, DbIncubatingAttributes.DbSystemValues.CLICKHOUSE),
        equalTo(DbIncubatingAttributes.DB_NAME, dbName),
        equalTo(ServerAttributes.SERVER_ADDRESS, host),
        equalTo(ServerAttributes.SERVER_PORT, port),
        equalTo(DbIncubatingAttributes.DB_STATEMENT, statement),
        equalTo(DbIncubatingAttributes.DB_OPERATION, operation));
  }
Then, the cases for the executeAndWait and execute methods:
class ClickHouseClientTest {
  ...

  @Test
  void testExecuteAndWaitWithStringQuery() throws ClickHouseException {
    testing.runWithSpan(
        "parent",
        () -> {
          ClickHouseResponse response;
          response =
              client
                  .write(server)
                  .query("insert into " + tableName + " values('1')('2')('3')")
                  .executeAndWait();
          response.close();

          response =
              client
                  .read(server)
                  .format(ClickHouseFormat.RowBinaryWithNamesAndTypes)
                  .query("select * from " + tableName)
                  .executeAndWait();
          response.close();
        });

    testing.waitAndAssertTraces(
        trace ->
            trace.hasSpansSatisfyingExactly(
                span -> span.hasName("parent").hasNoParent().hasAttributes(Attributes.empty()),
                span ->
                    span.hasName("INSERT " + dbName)
                        .hasKind(SpanKind.CLIENT)
                        .hasParent(trace.getSpan(0))
                        .hasAttributesSatisfyingExactly(
                            attributeAssertions(
                                "insert into " + tableName + " values(?)(?)(?)", "INSERT")),
                span ->
                    span.hasName("SELECT " + dbName)
                        .hasKind(SpanKind.CLIENT)
                        .hasParent(trace.getSpan(0))
                        .hasAttributesSatisfyingExactly(
                            attributeAssertions("select * from " + tableName, "SELECT"))));
  }

  @Test
  void testAsyncExecuteQuery() throws Exception {
    CompletableFuture<ClickHouseResponse> response =
        client
            .read(server)
            .format(ClickHouseFormat.RowBinaryWithNamesAndTypes)
            .query("select * from " + tableName)
            .execute();

    ClickHouseResponse result = response.get();
    assertThat(result).isNotNull();
    result.close();

    testing.waitAndAssertTraces(
        trace ->
            trace.hasSpansSatisfyingExactly(
                span ->
                    span.hasName("SELECT " + dbName)
                        .hasKind(SpanKind.CLIENT)
                        .hasAttributesSatisfyingExactly(
                            attributeAssertions("select * from " + tableName, "SELECT"))));
  }
}
Writing the Instrumentation
The java agent uses bytebuddy to inject code into the target classes. The first step is to create a class that
implements bytebuddy’s TypeInstrumentation interface, and write a typeMatcher method that will match the classes we
want to instrument. Since there are several implementations of the com.clickhouse.client.ClickHouseClient
interface, we’ll target the interface itself.
We then need to implement the transform method to target specific methods within the client that we want to apply
our advice to. In this case, the methods we want are executeAndWait and execute. Conveniently, both of these
methods take a ClickHouseRequest object as an argument, which is what we will use to extract information about the
request to populate our ClickHouseDbRequest object to store the data. This means we only need to write one advice
and we can apply it to both methods.
public class ClickHouseClientInstrumentation implements TypeInstrumentation {
  @Override
  public ElementMatcher<TypeDescription> typeMatcher() {
    return implementsInterface(named("com.clickhouse.client.ClickHouseClient"));
  }

  @Override
  public void transform(TypeTransformer transformer) {
    transformer.applyAdviceToMethod(
        isMethod()
            .and(namedOneOf("executeAndWait", "execute"))
            .and(takesArgument(0, named("com.clickhouse.client.ClickHouseRequest"))),
        this.getClass().getName() + "$ClickHouseExecuteAndWaitAdvice");
  }
  ...
The Instrumenter
Before we can write the advice methods, we need to create an Instrumenter
which encapsulates the logic for gathering telemetry. This will handle things like starting & ending spans and
running our attribute extractors, and will be used within the onEnter and onExit methods of the advice methods.
The Instrumenter is parameterized with REQUEST and RESPONSE types, which represent the input and output of the
instrumented operation. We will create a custom ClickHouseDbRequest class that will be used as the REQUEST type.
This class will encapsulate data we extract from the request that we can use to populate span attributes.
The instrumenter has a builder that allows us to add different attributes extractors and span name extractors. We’ll
implement the DbClientAttributesGetter and ServerAttributesGetter classes to gather the data to satisfy most of the
semantic convention span attributes, and leverage the DbClientSpanNameExtractor to extract the name of the operation.
These extractors are invoked automatically for us by the instrumenter within it’s
doStart method.
final class ClickHouseNetworkAttributesGetter
    implements ServerAttributesGetter<ClickHouseDbRequest> {

  @Override
  public String getServerAddress(ClickHouseDbRequest request) {
    return request.getHost();
  }

  @Override
  public Integer getServerPort(ClickHouseDbRequest request) {
    return request.getPort();
  }
}
final class ClickHouseAttributesGetter implements DbClientAttributesGetter<ClickHouseDbRequest> {
  @Nullable
  @Override
  public String getStatement(ClickHouseDbRequest request) {
    if (request.getSqlStatementInfo() == null) {
      return null;
    }
    return request.getSqlStatementInfo().getFullStatement();
  }

  @Nullable
  @Override
  public String getOperation(ClickHouseDbRequest request) {
    if (request.getSqlStatementInfo() == null) {
      return null;
    }
    return request.getSqlStatementInfo().getOperation();
  }

  @Nullable
  @Override
  public String getSystem(ClickHouseDbRequest request) {
    return DbIncubatingAttributes.DbSystemValues.CLICKHOUSE;
  }

  @Nullable
  @Override
  public String getUser(ClickHouseDbRequest request) {
    return null;
  }

  @Nullable
  @Override
  public String getName(ClickHouseDbRequest request) {
    String dbName = request.getDbName();
    if (dbName == null || dbName.isEmpty()) {
      return null;
    }
    return dbName;
  }

  @Nullable
  @Override
  public String getConnectionString(ClickHouseDbRequest request) {
    return null;
  }
}
We can now use these components to create our Instrumenter and expose it through a singleton class:
// javaagent/instrumentation/clickhouse/ClickHouseSingletons.java

public final class ClickHouseSingletons {

  private static final Instrumenter<ClickHouseDbRequest, Void> INSTRUMENTER;

  static {
    ClickHouseAttributesGetter dbAttributesGetter = new ClickHouseAttributesGetter();

    INSTRUMENTER =
        Instrumenter.<ClickHouseDbRequest, Void>builder(
                GlobalOpenTelemetry.get(),
                "io.opentelemetry.clickhouse-client-0.5",
                DbClientSpanNameExtractor.create(dbAttributesGetter))
            .addAttributesExtractor(DbClientAttributesExtractor.create(dbAttributesGetter))
            .addAttributesExtractor(
                ServerAttributesExtractor.create(new ClickHouseNetworkAttributesGetter()))
            .buildInstrumenter(SpanKindExtractor.alwaysClient());
  }

  public static Instrumenter<ClickHouseDbRequest, Void> instrumenter() {
    return INSTRUMENTER;
  }

  private ClickHouseSingletons() {}
}
The Advice
Now that we have the Instrumenter, we can write the advice that will be applied to the executeAndWait and execute
methods. Typically, this means writing onEnter and onExit methods which will be injected into the bytecode by the
java agent.
onEnter
I created a ClickHouseExecuteAndWaitAdvice class that is referenced within the transform method, and
started with the onEnter method. As mentioned before, executeAndWait and execute both take in a
ClickHouseRequest object as an argument, which we will use to extract information about the request to populate
our ClickHouseDbRequest object to store the data.
The logic within this method is very straight forward. We do some validation checks and extract the data we need from the request to pass to the instrumenter.
The start method of the Instrumenter takes the parent Context and the request (which contains information about the
operation being instrumented) as arguments. It creates a new span that represents the operation, sets the necessary
attributes on the span (like the operation name), and returns a new Context that has the newly created
span associated with it.
We then set that new context as the current context so that any new spans created within this scope will use the span in this context as their parent. When the scope is closed (typically in an onExit method), the previous context will be restored.
  @SuppressWarnings("unused")
  public static class ClickHouseExecuteAndWaitAdvice {
    @Advice.OnMethodEnter(suppress = Throwable.class)
    public static void onEnter(
        @Advice.Argument(0) ClickHouseRequest<?> clickHouseRequest,
        @Advice.Local("otelContext") Context context,
        @Advice.Local("otelScope") Scope scope,
        @Advice.Local("otelCallDepth") CallDepth callDepth) {

      callDepth = CallDepth.forClass(ClickHouseClient.class);
      if (callDepth.getAndIncrement() > 0) {
        return;
      }

      if (clickHouseRequest == null) {
        return;
      }

      Context parentContext = currentContext();

      ClickHouseDbRequest request =
          ClickHouseDbRequest.create(
              clickHouseRequest.getServer().getHost(),
              clickHouseRequest.getServer().getPort(),
              clickHouseRequest.getServer().getDatabase().get(),
              clickHouseRequest.getPreparedQuery().getOriginalQuery());

      if (!instrumenter().shouldStart(parentContext, request)) {
        return;
      }

      context = instrumenter().start(parentContext, request);
      scope = context.makeCurrent();
    }
onExit
The onExit method is where we close the span that was created in the onEnter method. Our instrumentation is as
basic as it gets, so it is not a very interesting piece of code. It simply closes the scope and instructs the
instrumenter to end the span. If any exceptions were thrown during the execution of the method, we pass that to the
instrumenter as well.
    @Advice.OnMethodExit(onThrowable = Throwable.class, suppress = Throwable.class)
    public static void onExit(
        @Advice.Thrown Throwable throwable,
        @Advice.Local("otelRequest") ClickHouseDbRequest clickHouseRequest,
        @Advice.Local("otelContext") Context context,
        @Advice.Local("otelScope") Scope scope,
        @Advice.Local("otelCallDepth") CallDepth callDepth) {

      if (callDepth.decrementAndGet() > 0) {
        return;
      }

      if (scope == null) {
        return;
      }

      scope.close();
      instrumenter().end(context, clickHouseRequest, null, throwable);
    }
Testing it out
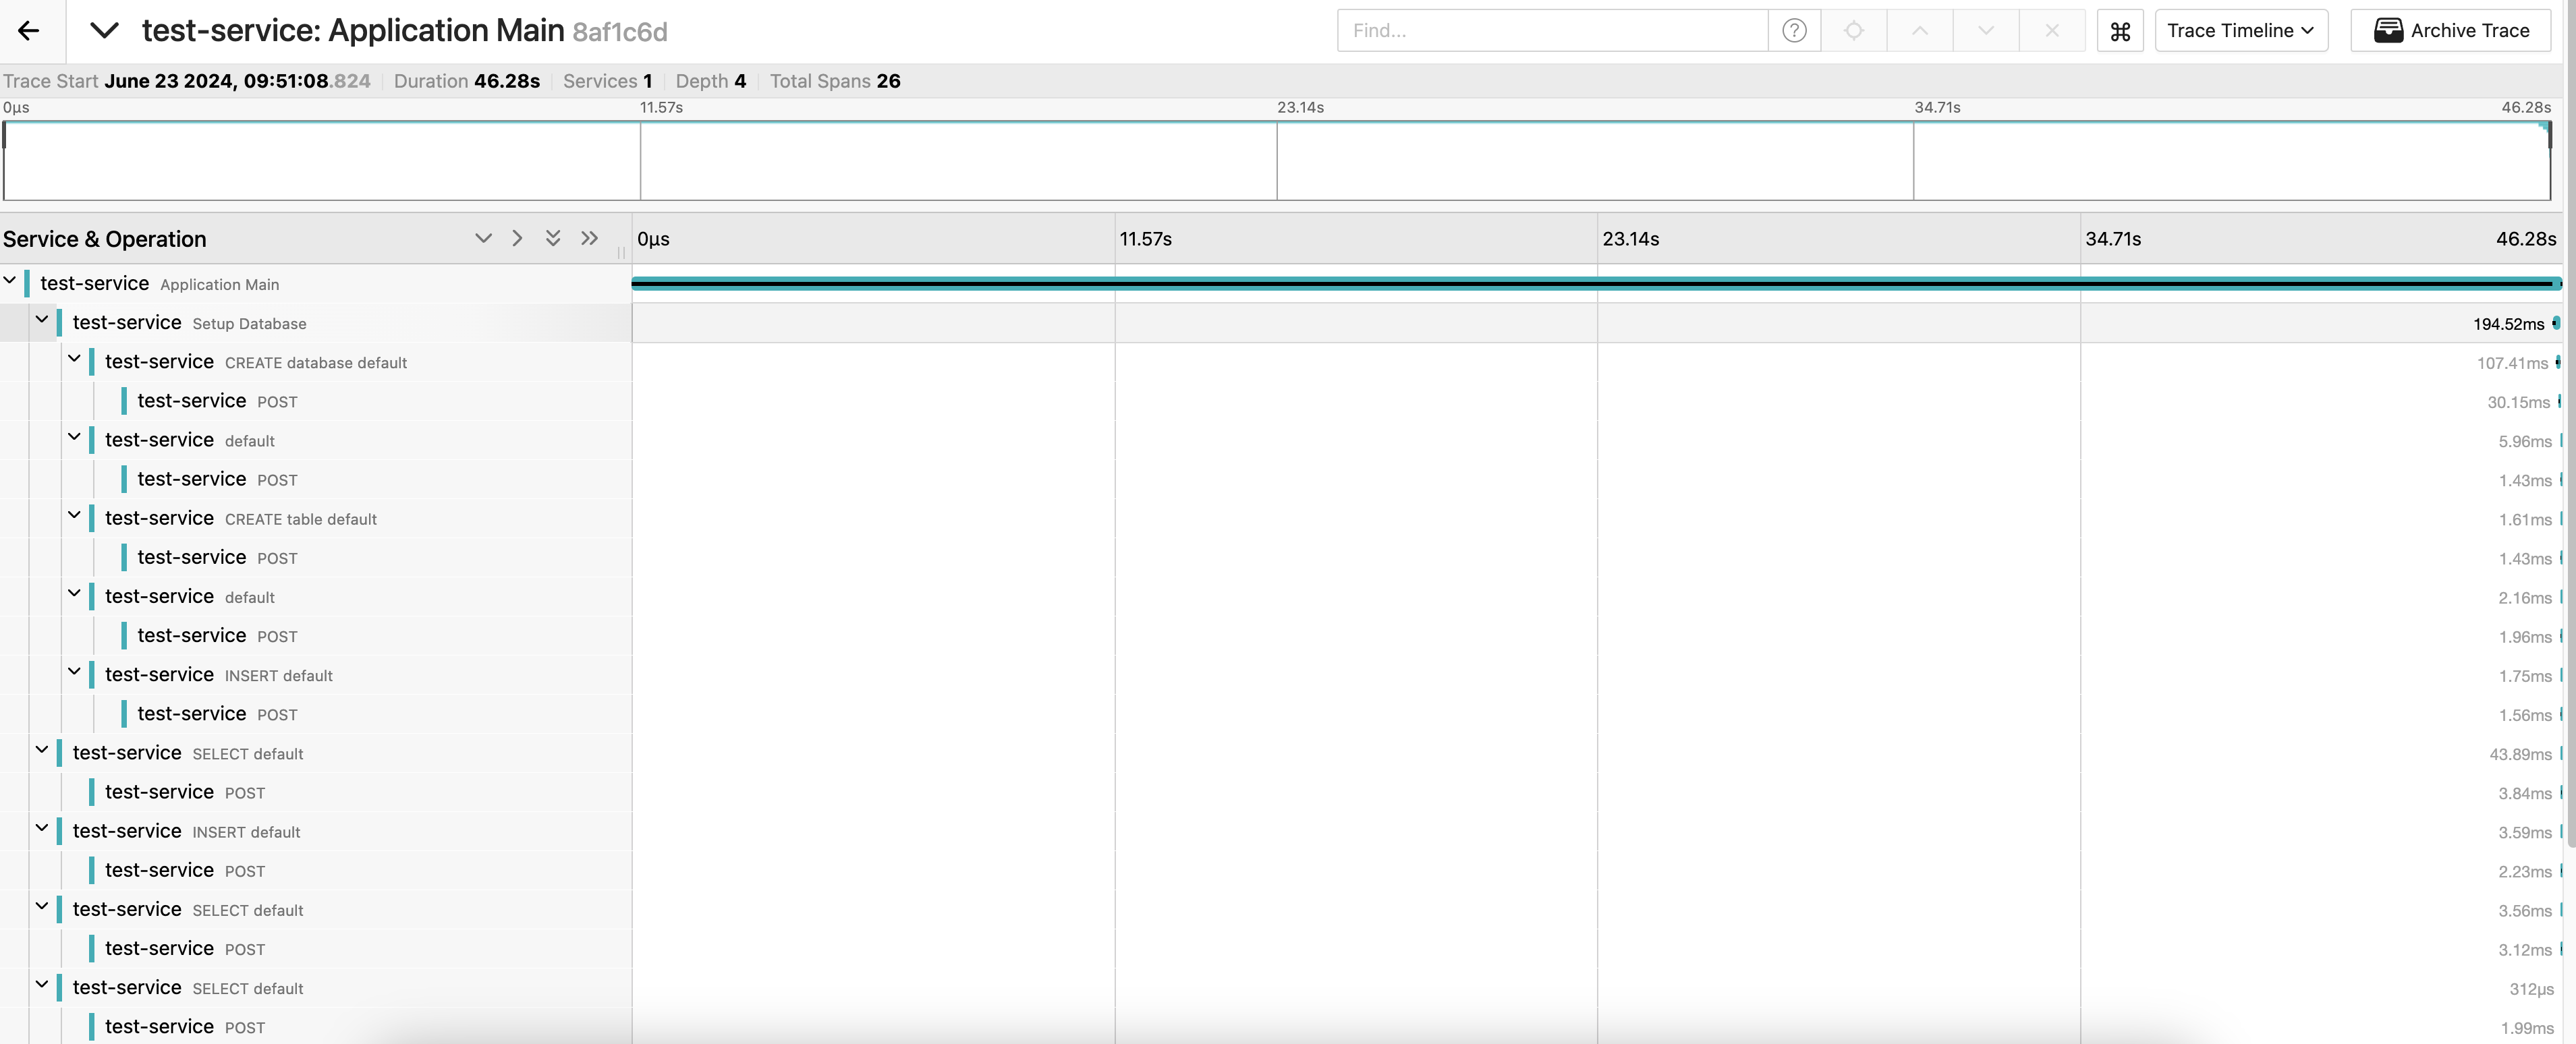
With the advice methods in place, we can now run our tests to verify that the spans are being created as expected, and they are. We can also build a local version of the agent and run it against the test lab to verify that everything looks as it should in a UI like jaeger:
The asynchronous execution of queries was also working as expected:

And we can verify that for traces that encounter exceptions, everything looks as it should:
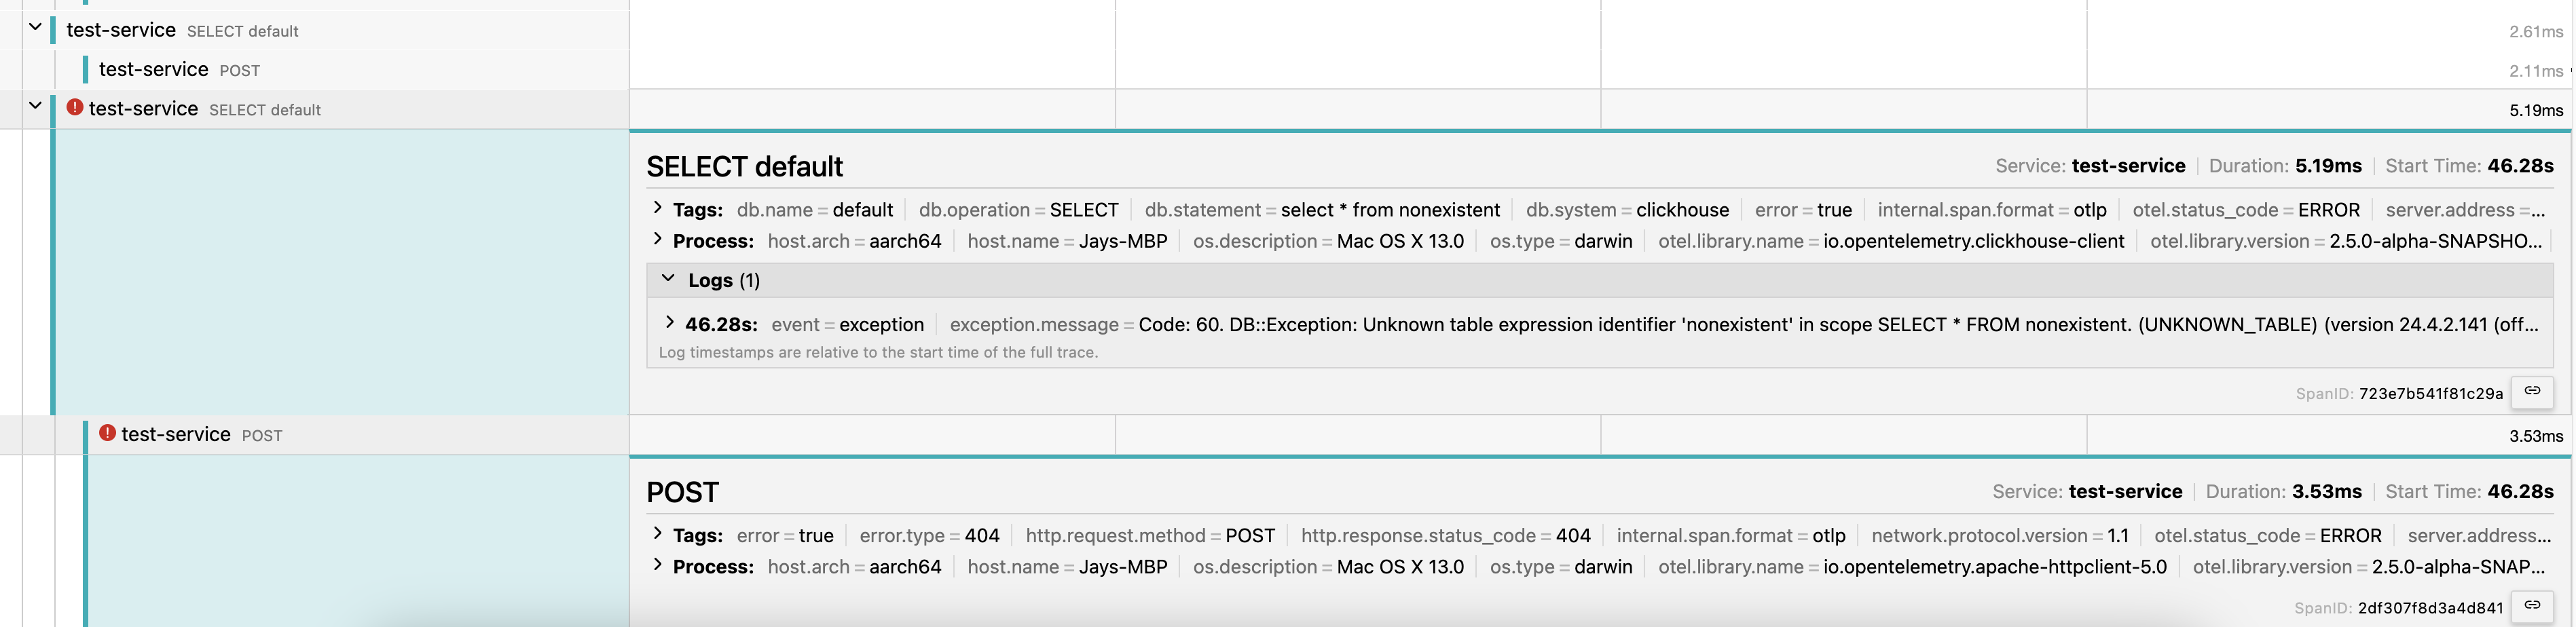
Success!
Followups
Shortly after releasing the instrumentation, a bug was reported where things were not working for a user, and turned out that I had missed some handling of different versions of the connection string. I addressed that in a followup PR here.
There is an initiative to convert instrumentation to leverage the new invoke dynamic bytecode approach of instrumentation (also referred to as “indy”). I followed up with a conversion for this module in a PR here. Among other things, this change allows for setting and using breakpoints in the instrumented code, which is a huge improvement for writing and debugging the code. See more information about this approach in the proposal.